Tuesday 26 December 2017

Mindfulness #2 Journal Page


Morning, Carolyn here with you today, hope you all enjoyed your Christmas festivities yesterday.

This is a recent Journal Page I created using the Mindfulness #2 and Shine Bright stamp sets. I used some of the Collectors Edition stamps with Distress Oxides for the masterboard background. The stamps included BubblesNumbers and Circle Dots plus the Inky Dink Trellis stencil which is a favourite of mine. Purple and teal seem to be my go to colours of choice although I'm partial to a bit of orange too.


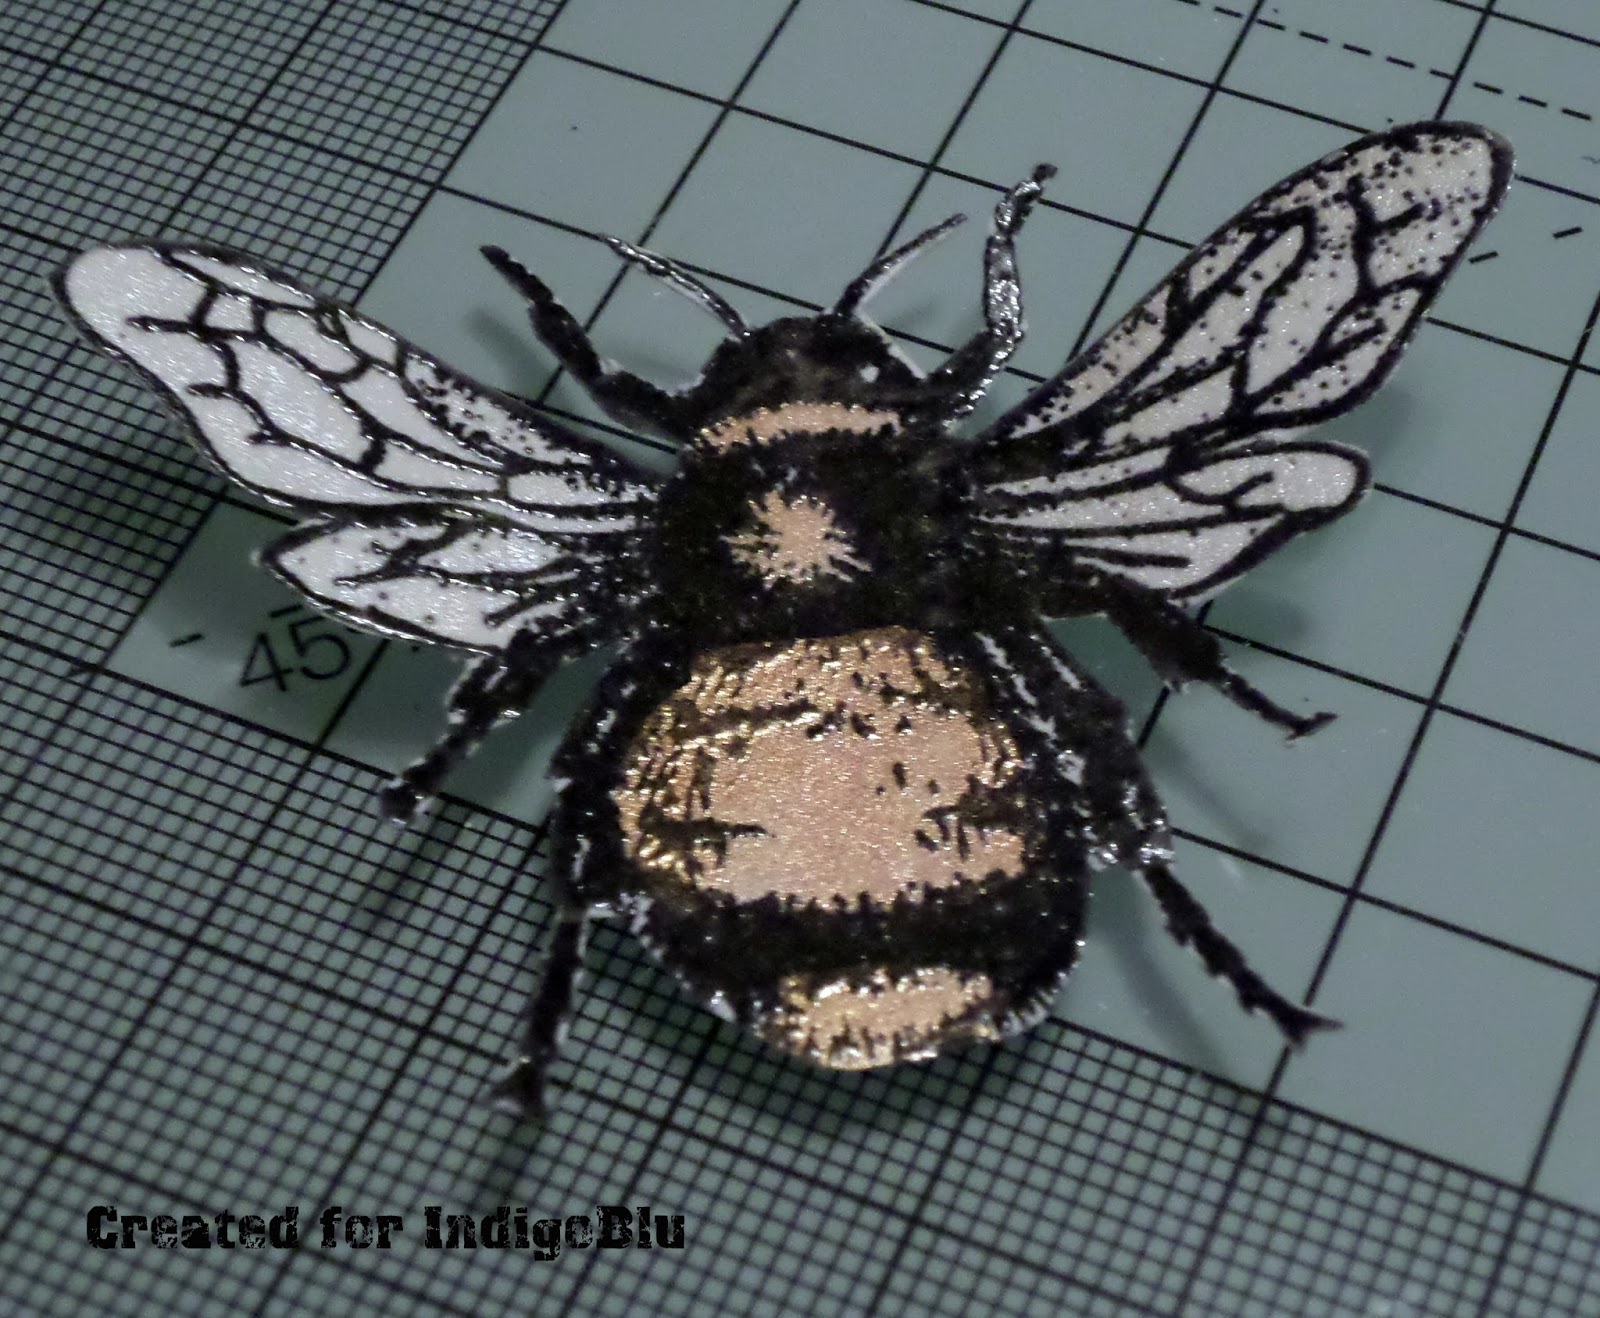
The detail on the wings is fabulous and I've highlighted areas with a white Posca pen.


Thank you for stopping by and I look forward to sharing more projects with you soon. In the meantime why not pop back soon to see lots more inspiration from the team.

This is my last blog post for 2017 so I wish you well and best wishes for 2018.

Carolyn 
xxx


Monday 25 December 2017

Merry Christmas

Hello Everyone and Welcome!

Today Ksenija is here, and I am happy to share with you a new project as a part of December inspiration from International DT.

Today I am featuring the Christmas Wreath red rubber stamps set. I am really in love with this set.

Tips on Making This Card:

  • Trim the panel from white card stock down to 4 1/4 by 5 1/2" (10 by 14 cm)
  • Stamp the wreath in black archival ink off the edge
  • Colour the impression with watercolour markers
  • Stamp the wreath in black archival ink down to a piece of white card stock and colour the bow and one of the anise stars. 
  • Fussy cut out the bow and the anise star.
  • Stamp down the sentiment from the same set.
  • Adhere the card panel to the black card base and pop up the bow and the star with foamed tape.
  • Add glitter to some of the elements of the wreath
I am sending you my most sincere wishes of health and happiness this Christmas! Thank you so much for stopping by!

IndigoBlu Supplies Used:
Christmas Wreath Rubber Stamps Set

Monday 18 December 2017

Saturday 16 December 2017

Seahorse Stamp


Hello Kay M here,   I would like to share this seahorse tag with you today.  It's similar to one I made for Kay's launch of the last four stamps in the Collectors Edition on Hochanda last weekend.  This one has the seahorse, crackle and compass new stamps.


I painted a grey board tag with black GeeSsoGood and when dry the crackle stamp was stamped randomly over with an embossing ink and heat embossed in clear embossing powder.   The compass stamp was then stamped over the tag with the embossing ink and this time bronze Luscious powder was added to the clear powder before heat embossing.


Goldfinger and MissMoneypenny paints were painted onto Wet Media Dura-Lar(you could use acetate) and Gold and pink Luscious powders painted onto white card and left to dry. 


The seahorse was stamped with StazOn on the non painted side of the Dura-Lar  and also one onto gold shrink film.  Seashells from Under the Sea set were stamped over the painted Luscious powders and a sentiment onto white card.  These were then cut out and shaped and the gold seahorse heat shrunk.     


All the elements were adhered to the tag and string added to finish the tag.  I removed the hole from seahorse as I changed my mind about were to place him!


I hope you have enjoyed this tag and do check out the latest Collection Edition Nos 9, 10, 11 and 12, they're fabulous!

Take care,   Kay M x  

Wednesday 13 December 2017

Bee Happy


Hello Cheremane here with you today. I have used the fabulous new Collectors edition stamps which were released on Hochanda on the weekend with Kay, there is now also a storage box for the Collector edtion stamps so you can keep all 12 stamps in one place. My Collector edition stamps never leave my desk,

Firstly I stamped the two small bee's with Versafine black ink onto a 6x6 card blank. Then added a black mat into the middle.

I mixed some Gold Luscious powder with water to colour my Bumble Bee's. 

Luscious powders do really add a wow to your project. I also added a white layer and then stamped Happy from Aloysius into the middle with versafine black.

I stamped out the large Bee with versafine and heat embossed it with fine clear embossing powder before colouring with Gold Luscious and Porcelin Luscious for the wings before placing in the middle above the Happy to make Bee Happy. 

Thank you for dropping by today, be sure to pop back to the Blog soon for lots more inspiration from the team.
Crafty Hugs
Cheremane x

Tuesday 12 December 2017

Dianne

Hello Dear reader,

Today I have a totally different card for you.
I have colored the wonderful stamp "Dianne" with my pencils


This girls hair, is so great to color, I really like it. 
I use several pink colors in different shades, a dark grey and black for the
deeper shadows.

In combination with the lovely papers from the paperstack "Emporium of Cursiosities
You can make such beautiful cards. 
The stamp is very big, and I don't like to cut in to beautiful paper or glu a big
stamp on the paper so you don't see the design. 


I rip the half of the front from the Black basic card
Did the same with Peach cardstock and the design paper.
On this half I glu the colored picture after matting on Peach and Black cardstock.
When you open the card you will see the whole design.


So I hope to inspire you, to pick up your pencils and go coloring.
With lovely hugs to all dear readers, and I wish everyone a wonderful
Christmas time and all the best wishes for the New Year.


Monday 11 December 2017

Christmas Wreath 6x6 Greetings Card


Hi everyone - Mike here!

So the snow has started to fall here in the UK and I thought I'd get even more into the festive mood by creating a 6x6 Christmas wreath greeting card using the IndigoBlu stamp set of the same name.


IndigoBlu products I've used in this project are:

If you'd like to watch how I created the card from start to finish in real time, then please click the YouTube link below to watch the creation process from beginning to end!


Don't forget to subscribe to the IndigoBlu YouTube channel for future project videos from me and others on the design team!


Tuesday 5 December 2017

Christmas Moon Baubles


My Christmas creations are now in full swing, how are yours going? 

I picked up some inexpensive chipboard baubles at Ally Pally in September, and I thought it was about time I used them!


I prepared the chipboard baubles with a coat of white gesso which provides a good surface for the paints. To make a moon I cut a circle out of a masking sheet, and positioned it onto the bauble. I used diluted stroke of midnight and iced gem paints, and also some raspberry luscious. I swept them over the bauble. When dry I peeled back my  mask to reveal my Christmas moon. 

I used versamarker to stamp  the Stag Cliffhanger and heat embossed him in black.

I painted in some more details, and then flicked white paint over the scene to create a snowfall.


To add a silver top to the bauble, I first masked the top by wrapping around some masking tape , and swept on some flitterglu followed by some silver flakes from the winter dawn  megaflakes.

After removing the tape I used the all important scoochy foam to remove the excess and to polish it a little.


I hung my Christmas Moon Baubles up, but they could also go onto the front of a card or be used  as a gift tag for someone very special.

I hope you are having fun creating your Christmas/Winter decorations and cards with Indigoblu.


Monday 4 December 2017

Fabulous Guest Designer Marie Johansson


Hello Crafty Souls!

I´m thrilled to be back on the IndigoBlu blog as Guest Designer today.

Kay kindly sent me the Deer Forest A6 stamp to play and I crated these two holiday themed cards using it.


For this first card I stamped and embossed with black fine embossing powder. I fussy cut out the image and added it with 3D stickers on my card. Using black make the Deer´s really pop - it kind of reminds of a forest at night and the animals lid up by a car light.


The Merry Christmas sentiment come from the stamp set Here comes Santa.


This second card was made with the same technique, but instead of black I chose golden embossing powder to achive a more festive look.


I hope you like my projects!

Thank you for stepping by the Indigo Blu blog today.

Best Wishes